Jinko: Theme Documentation
By: 3Forty Media | Follow me on Themeforest
Introduction
Thankyou for purchasing Jinko.
This document will help you get your theme installed and setup with further guides to help you get the most out of your theme. If you do have questions please leave a comment or send me a message through my profile page.
If you like Jinko, please take a moment to rate or leave a comment or review, it really helps. Thanks so much!
Installation - top
Download your theme
Download the zipped package from your ThemeForest Downloads to your computer. Extract the downloaded file and you will see Jinko.zip, this is your theme archive.
Install theme
- Login to your WordPress Admin and go to: Appearance → Themes.
- At the top of the screen click Add New and then click Upload Theme.
- Select Jinko.zip archive file and click Install Now.
- Once installation is complete click Activate.
Install Child Theme *Optional
If you wish to add your own custom modifications I recommend installing the Jinko child theme and adding your modifications. This will ensure you will not lose your changes when you update Jinko theme.
You will need to install the parent theme first (above)
- Login to your WordPress Admin and go to: Appearance → Themes.
- At the top of the screen click Add New and then click Upload Theme.
- Select Jinko-child.zip archive file and click Install Now.
- Once installation is complete click Activate.
Plugins - top
Plugins are not required but are recommended to get the most out of your theme.
Some theme demo's will not work properly without the required plugins
To install plugins
- Appearance → Plugins.
- Check each plugin you want to install and select Install from the drop down menu.
- Click Apply.
- Once installed go to Plugins → Installed Plugins and activate each plugin.
Recommended plugins

Jinko Theme Plugin
A collection of additional features, theme options, post displays and add-ons for your theme.
MC4WP: Mailchimp for WordPress
Mailchimp for WordPress, the #1 unofficial Mailchimp plugin.
Breadcrumb NavXT
Breadcrumb NavXT, the successor to the popular WordPress plugin Breadcrumb Navigation XT, was written from the ground up to be better than its ancesto...
If you are using Yoast SEO plugin you can enable breadcrumbs in Yoast settings, Jinko supports Yoast SEO
Post Views Counter
Post Views Counter allows you to display how many times a post, page or custom post type had been viewed with this simple, fast and easy to use plugin.
Demo Import - top
Jinko includes many pre-built demos and optional demo content to help get you started. To install a demo
- Install & Activate One Click Demo Import
- Go to Appearance → Import Demo Data.
- Select a demo and click Import Demo
- Confirm by clicking Continue & Import
Note* If you have existing content you should click Switch to Manual Import to import just the settings. The required Widgets WIE file and Customizer DAT file are included in your full theme download
Due to licensing restrictions featured images used in the demos are not included. Placeholder images are included in demo data.
How to update your theme - top
Important* Backup your database and backup any theme file modifcations you have made before updating your theme. You will need to add your file changes again after updating your theme.
Envato Market Plugin
You will need to download Envato Market Plugin to use this method
Install Envato Market Plugin
- Appearance → Plugins → Add New
- Click Upload
- Locate and select the Envato Market plugin and click Install
- Once installed click Activate Plugin
Configure your Envato API
- Click the link in the Activate Envato API Connection
- Sign in to your Envato Account if you are not already
- Enter a Token Name
- Check the following options:
- View and search Envato sites
- Download the user's purchased items
- List purchases the user has made
- Terms and Conditions agreement
- Click Create Token button
- Copy the token
- Paste the token into into your Envato Market Dashboard token field and Click Save
Whenever a theme update is available you will see an Update Available notice.
Manual update
Menus - top
Jinko has several menu locations. The method for creating each menu is the same, simply select a different display location for each menu.
To create a new menu
- Go to Appearance → Menus.
- Click Create a new menu.
- Enter a name for your menu (E.g. Primary Menu) and click Create Menu.
- In the Add Menu Items panel add categories, posts, pages & custom menu items. Click Add to Menu and arrange as required
- Select a display location (E.g. Primary Menu)
- Click Save Menu
Menu locations
Primary Menu
The primary menu is located in the three site header layouts. The primary menu supports multiple levels
- Default
- Logo Below Nav
- Logo Left Menu
You can also set your primary menu to Toggle Sidebar to add a mobile menu on small devices.
Toggle Sidebar Primary Menu
Located in the slide out sidebar and supports unlimited levels
Footer Menu
The footer menu is located in w/Menu footer layouts
Split Menu
Split Menu is located in the header layout: Logo Split Menu and consists of two menu locations; Split Menu Left & Split Menu Right
Header Secondary
The secondary menu is located in the left or right side of all header layouts. This menu is useful for subscribe or call to action buttons or the Jinko multi level social menu
Multi column & Mega Menu - top
When you create a parent → child menu item (or sub menu) you can set the sub menu to a display in columns or a full width megamenu style drop down
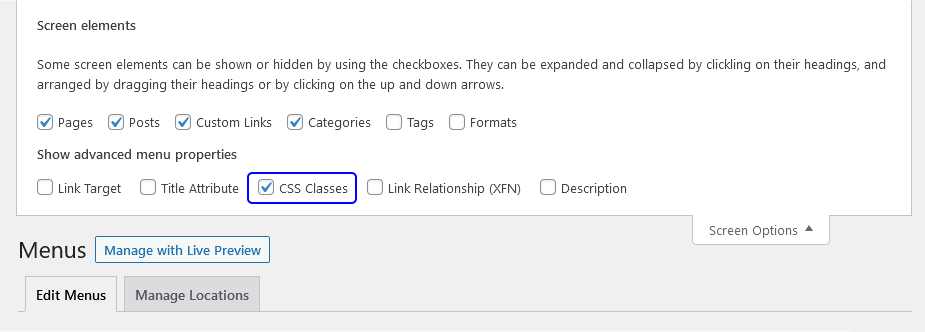
- Go to Appearance → Menus.
- Click Screen Options tab at the top of the page.
- Check CSS Classes checkbox.
Create the parent menu item
- Expand the parent menu item and add one of
tfm-cols-2ortfm-cols-3ortfm-cols-4ortfm-cols-5ortfm-megamenuin the CSS Classes field - Additionally to add category color styling to sub-menu category items add
tfm-categoriesto the parent menu item CSS Classes field - Click Save Menu
Social Menu - top
The social menu is a drop down menu that displays social media icons and text within menu items.
You can add the social menu to any multi-level menu (E.g. Primary Menu) or assign to a display location such as the Third Menu.
- Go to Appearance → Menus.
- Click Screen Options tab at the top of the page.
- Check CSS Classes checkbox.
Create the parent menu item
If you are adding menu items to an existing parent menu (E.g. Primary Menu) you can skip this step. You will still need to add tfm-social-menu to the parent menu item.
- Click Custom Links in the Add menu items panel
- Add a Hashtag to the URL field and text to the Link Text field
- Click Add to Menu
- Expand the menu item and enter
tfm-social-menuin the CSS Classes field - Remove the hashtag from the URL field
Add the sub menu items
- Click Custom Links in the Add menu items panel
- Add the full URL for your social media page in the URL field and text in the Link Text field
- Click Add to Menu
- Arrange this item as a sub-menu item
- Expand the menu item and enter the relevant CSS class in the CSS Classes field. E.g.
tfm-twitterto show the Twitter social icon - Repeat for every social media site you want to add (supported icon list below)
Set Location & Save the menu
- Choose a display location in the Menu Settings panel
- Click Save Menu

Supported icons & CSS classes
| X | tfm-x | tfm-facebook | |
|---|---|---|---|
| tfm-pinterest | YouTube | tfm-youtube | |
| tfm-instagram | Flickr | tfm-flickr | |
| Vimeo | tfm-vimeo | Vkontakte | tfm-vk |
| Tumblr | tfm-tumblr | Dribbble | tfm-dribbble |
| RSS | tfm-rss | Linked In | tfm-linkedin |
| 500px | tfm-500px | Soundcloud | tfm-soundcloud |
| Spotify | tfm-spotify | Mixcloud | tfm-mixcloud |
| Medium | tfm-medium | Github | tfm-github |
| Behance | tfm-behance | tfm-reddit | |
| Gab | tfm-gab | Minds | tfm-minds |
| BitChute | tfm-bitchute | Steemit | tfm-steemit |
| TikTok | tfm-tiktok | Odnoklassniki | tfm-ok |
Call to action/Subscribe Button - top
- Go to Appearance → Menus.
- Click Screen Options tab at the top of the page.
- Check CSS Classes checkbox.
- Create your call to action/subscribe menu item.
- Expand the menu item and enter
tfm-ctain the CSS Classes field - To add a subscribe icon add
tfm-cta tfm-subscribein the CSS Classes field - To add a patreon icon add
tfm-cta tfm-patreonortfm-patreon-altin the CSS Classes field
A call to action button can be applied to any item in any menu or a single menu item assigned to a separate display location (E.g. Header Secondary).
Widgets - top
Jinko supports classic widgets & block widgets. Since WordPress 5.8.0 there are three methods of adding widgets.
Add a widget
- Go to Appearance → Widgets
- Select a sidebar
- Click the Plus button at the top of the page or inside the sidebar
- Search or Browse and select a widget
- Configure the widget and click Update
Add a widget with preview (customizer method)
- Go to Appearance → Customize → Widgets
- Select a sidebar (dependng on the page your are on not all sidebars will be visible)
- Click the Plus button at the top or bottom of the customizer panel
- Search or Browse and select a widget
- Configure the widget and click Publish
Add a widget (classic method)
Since WordPress 5.8.0 you will need to install the Classic Widgets plugin to use this method
- Go to Appearance → Widgets
- Drag the widget to the appropriate sidebar
- Configure the widget and click Save
Configure widget colours in Colour Settings.
Custom Widgets
You need to install Jinko Theme Plugin to use these widgets.
Jinko Posts Widget
- Add Jinko Posts Widget to your sidebar by your chosen method
- Configure the widget and click Save/Publish
Jinko Social Widget
- Go to Appearance → Customize → Jinko: Social Media Settings
- Enter the full URL's of your social media channels
- Click Publish
- Add the Jinko Social Media widget to your sidebar by your chosen method
- Configure the widget and click Save/Publish
Add Widgets Between Posts - top
The category page and homepage have a sidebar between blog list posts. These work like any other sidebar and support all widgets.
Homepage Widgets
- Add your widget to Home: Between Blog Posts sidebar by your chosen method
- Go to Appearance → Customize → Jinko: Theme Settings → Homepage Settings
- Scroll down to Add widgets between posts
- Enter the position you would like to display your sidebar (E.g. 3 to set your sidebar as the third item in the blog list)
- Click Publish
Category Widgets
- Add your widget to Category: Between Blog Posts sidebar by your chosen method
- Go to Appearance → Customize → Jinko: Theme Settings → Archive/Category Settings
- Scroll down to Add widgets between posts in Category Pages
- Enter the position you would like to display your sidebar (E.g. 3 to set your sidebar as the third item in the blog list)
- Click Publish
Install Widget Context or Jetpack plugin and enable Widget Visibility to hide/show different widgets for different categories, posts and pages.
Go To Plugins → Add New. Search for Jetpack or Widget Context. Download & activate the plugin.
Theme Settings - top
All theme settings are managed with Live preview within the WordPress customizer separated into easy to manage sections and tabs.
Homepage Settings
Appearance → Customize → Jinko: Theme Settings → Homepage Settings
Archive/Category Settings
Appearance → Customize → Jinko: Theme Settings → Archive/Category Settings
These settings apply to all category, archive, author, tag and search archives
Single Post Settings
Appearance → Customize → Jinko: Theme Settings → Single Post Settings
You can override these global settings or set your options on a per post basis at the bottom of the New/Edit Post Settings Panel in the Jinko: Post Options section
Jinko Post Options
Jinko post options allow you to override global theme settings on a per-post basis.
Single Post Style
Override the global post style setting
Single Sidebar
Override the global sidebar setting
Thumbnail Aspect Ratio
Override the global thumbnail aspect ratio setting
Disable Single Featured Image
Disable the featured image in single post view.
Page Settings
Appearance → Customize → Jinko: Theme Settings → Page Settings
You can override page sidebar settings or set your sidebar on a per page basis at the bottom of the New/Edit Page Settings Panel in the Jinko: Page Options section
Header Settings
Appearance → Customize → Jinko: Theme Settings → Header Settings
Footer Settings
Appearance → Customize → Jinko: Theme Settings → Footer Settings
Display social icons in the footer
Display MailChimp Signup form before footer
You will need to install Jinko Theme Plugin & Mailchimp for WordPress plugins to use this feature
- Go to Appearance → Customize → Jinko: Theme Settings → Footer Settings
- Check: Display MailChimp Form in Footer Area
- If you have multiple forms enter the Form ID of the form you want to display
- Add your form title
- Choose location
- Click Publish
Logo Settings
Appearance → Customize → Jinko: Theme Settings → Logo/Site Title Settings
Colour Settings - top
Appearance → Customize → Jinko: Color Settings
Choose light/dark theme
Appearance → Customize → Jinko: Color Settings → Color Mode
Set light theme colors
Appearance → Customize → Jinko: Color Settings → Light theme
Set dark theme colors
Appearance → Customize → Jinko: Color Settings → Dark theme
Create a separate blog list page
- Go to Pages → Add New
- Create a page for Post blocks (this will be your Homepage)
- Create a page for Blog posts (this will be your Posts Page)
- Go to Settings → Reading
- Set Your homepage displays to A static page
- Select the Post blocks page you created from the Homepage selection.
- Select the Blog posts page you created from the Posts page selection.
- Click Save Changes
You may want to add a link to your blog posts page in your menus
Related Posts - top
- Go to Appearance → Customize → Jinko: Related Posts
- Check Display Related Posts
- Configure related post settings & colours and click Publish
Social Media Settings - top
Display share icons in posts & pages
- Go to Appearance → Customize → Jinko Social Media Settings
- Check each share icon you want to display in Post & Page Share Icons
- Choose an Icon Style and Colour Scheme
- Check: Share Posts/Pages
- Choose a display location
- Click Publish
Display author bio social icons
- Go to Users → Profile
- Enter the full URL's of your social media channels and click Save
- Go to Appearance → Customize → Jinko Social Media Settings
- Scroll down to Author Bio Social Icons and check Show Icons in Single Author Bio
- Choose an Icon Style and Colour Scheme
- Click Publish
Display social icons in the header & footer
- Go to Appearance → Customize → TFM Social Media Settings
- Enter the full URL's of your social media channels
- Choose an Icon Style and Colour Scheme
- Check: Show Social Icons in Site Header/Footer
- Click Publish
Social Media Widget
- Go to Appearance → Customize → Jinko: Social Media Settings
- Enter the full URL's of your social media channels
- Click Publish
- Add the TFM Social Media widget to your sidebar by your chosen method
- Configure the widget and click Save/Publish
Advertising Areas - top
You can add your own banners, Google AdSense code or any other banner code to any sidebar using the HTML widget or image widget.
Add Google AdSense (or any other banner code)
- Add the HTML widget to your sidebar by your chosen method
- Enter your Advert Code (for example Google AdSense)
- Click Publish
Add a banner image and link
- Add the Image widget to your sidebar by your chosen method
- Enter your Advert Code (for example Google AdSense)
- Click Publish
Jinko: Dedicated Advertising Areas
Upload your own banner and link
- Go to Appearance → Customize → Jinko: Advertising
- Select an Advertising Location
- Add you advert code or Upload a standard resolution and/or high resolution banner
- Enter the desination URL
- Click Publish
Theme Translation - top
Install Loco Translate Plugin
- Go To Plugins → Add New. and search for Loco Translate
- Download & Activate the plugin
- Loco Translate is now added to the admin panel
Create a New Theme Translation
- Go to Loco Translate → Themes.
- Click Jinko.
- Click New Language.
- Choose a language from the drop down menu and click Start Translating.
- In the source text field select the text you want to translate.
- In the translation field type your translation for the selected text.
- Click Save.
Change your site language to see the new translation
Create a New Plugin Translation
- Go to Loco Translate → Plugins.
- Click the plugin you want to translate.
- Continue from step 3 above.
To change text strings but not the language select the same language that is set in Settings → General → Site Language
Optimization (Page Speed/SEO) - top
The best thing you can do for your website speed is to host your website on a good VPS/Dedicated server or a good hosting package. You can also improve your site speed with one of the many cache or optimization plugins.
Recommended plugins
WP Super Cache
A very fast caching engine for WordPress that produces static html files.
Autoptimize
Autoptimize speeds up your website by optimizing JS, CSS, images (incl. lazy-load), HTML and Google Fonts, asyncing JS, removing emoji cruft and more.
Install Autoptimize Plugin
- Go To Plugins → Add New. and search for Autoptimize
- Download & Activate the plugin
- Autoptimize is now added to the settings panel
Configure Autoptimize settings
Settings → Autoptimize Or click the Autoptimize icon at the top of the page
JS, CSS & HTML
- Check Optimize JavaScript Code
- Check Aggregate JS-files
- Check Optimize CSS Code
- Check Aggregate CSS-files
- Check Also Aggregate inline CSS
- Check Inline all CSS
- Check Optimize HTML Code
- Check Save aggregated script/css as static files
- Check Minify excluded CSS and JS files
- Check Also optimize for logged in users
Check/Remove any other settings as required.
Extra
Google Fonts
- Check Leave as is
Check/Remove any other settings as required and click Save
Install OMGF Plugin
- Go To Plugins → Add New. and search for OMGF
- Download & Activate the plugin
- Optimize Google Fonts is now added to the settings panel
Configure OMGF
Settings → Optimize Google Fonts
- Check Auto-Configure Subsets
- Click Save & Optimize
Install WP Super Cache
- Go To Plugins → Add New. and search for WP Super Cache
- Download & Activate the plugin
- WP Super Cache is now added to the settings panel
Configure WP Super Cache
Settings → WP Super Cache
- Check Caching On
- Click Update Status
The Advanced tab allows you to configure cache timeout and other settings as required.
Optimize Images
I recommend using next gen image formats such as WebP. You can also reduce the quality of stored images to reduce file size and improve page speed. Jinko uses native WordPress image sizes for all displays with optional custom sizes when available.
Install Regenerate Thumbnails Plugin
Regenerate Thumbnails
Regenerate the thumbnails for one or more of your image uploads. Useful when changing their sizes or your theme.
- Go To Plugins → Add New and search for Regenerate Thumbnails
- Download & Activate the plugin
- Regenerate Thumbnails is now added to the Tools menu
Regenerate images
- Go To Appearance → Customize → TFM Theme Boost.
- Change Image Quality to 65* and click Publish
- Go to Tools → Regenerate Thumbnails
- Un-check Skip regenerating existing correctly sized thumbnails (faster).
- Click Regenerate Thumbnails for All x Attachments
* You can try different image quality settings until you are happy with the result.
Post Formats - top
You can set post formats in the New/Edit Post settings panel → Post Format
Standard Format
Select this format for standard posts, you can emebed media, galleries, images and video as normal.
Gallery Format
This format adds a gallery icon to posts (if post format icons are enabled). Gallery format functions like a standard post format.
Video/Audio Format
This format adds a video/audio icon to posts (if post format icons are enabled).
Add video/audio to the featured area in single posts
- Go to Posts → Add New or edit an existing post
- Embed the video/audio you want to feature as the first element in your content
- Add any other post content as normal
- In the Settings Panel select Video/Audio Post Format
- In the Settings Panel under Jinko: Post Options check Disable Single Featured Image
- Click Publish
Note* If your post does not have a featured image you can ignore these steps and just select video format.
Image Format
Image format has a cover style in archive and blog list displays.
You can customize the image format in Appearance → Customize → Jinko: Theme Settings → Image Format Settings
Theme Hooks - top
Hooks allow you to further extend theme functionality by adding your own functions, sidebars, banners or plugin output. This is advanced functionality for theme developers.
Example use of a Hook
This function will output "lorem ipsum dior" after the theme header.
function my_custom_function( ) {
  echo '<h2>' . esc_html__( 'lorem ipsum dior', 'Jinko' ) . '</h2>';
}
add_action('tfm_after_header', 'my_custom_function', 10 );
Available hooks
- tfm_before_header
- tfm_after_header
- tfm_header_left
- tfm_header_right
- tfm_after_content
- tfm_before_single_content
- tfm_author_bio_bottom
- tfm_before_wrapper_close
- tfm_after_entry_wrapper
- tfm_before_post_pagination
- tfm_page_footer
- tfm_before_footer
- tfm_after_footer
- tfm_append_footer_bottom
- tfm_before_loop
- tfm_after_loop
- tfm_before_comments
- tfm_after_comments
- tfm_before_entry_title
- tfm_after_entry_title
- tfm_after_wrap
- tfm_prepend_after_title_meta
- tfm_append_after_title_meta
- tfm_hentry_footer_before
- tfm_hentry_footer_after
- tfm_after_continue_reading_button
How to change fonts - top
I recommend Fonts Plugin or Easy Google Fonts
Sources and Credits - top
I've used the following images, icons or other files as listed.
- PHP, HTML and CSS code by 3FortyMedia
- Fontello Icon Fonts
- Images Freepik & Unsplash & WallpaperAccess
Changelog - top
May 07, 2024 - Version 1.1.1
- fixed dark/light toggle ignoring visibility status on mobile devices
March 29, 2024 - Version 1.1
- fixed read time toggle related posts
- fixed very light grey color selector in Gutenberg editor
- fixed border radius related posts on mobile devices
- fixed share overlay border radius
- added excerpt length setting to Jinko posts widget
- new language files (jinko plugin)
- fixed cover style Jinko posts widget inheriting footer colours
- fixed footer social icons not inherting footer colour in dark mode
- added alt text to plugin images
- improved smart image selection tfm theme boost
- improved web vitals seo and best practices
- Fixed RTL language breaking styling (thanks: LazySan)
March 20, 2024 - Version 1.0
- Initial Release